Tuesday, December 27, 2022

Baking with Natural Yeast - Sweet and Savory Crepes


Ode To The Leftovers:

When holidays come and go,
the refrigerator over-flows.

Left-overs become a take-over;
what is needed is a hostage negotiator!

Ham, eggs, yogurt, and berries that were on sale,
ALL the things TOGETHER seem like a fail...

But oh, "hallelujah!" I have to say -
Crepes come in to save the day!

With a savory and a sweet; 
(This for dinner???)  YUP! It can't be beat.


 - - - - - - - - - - - - - - - - - - - - - - - - - - 


Baking with Natural Yeast 
- Sweet and Savory Crepes -


Layer in a blender:
2 cups Natural Yeast Starter
1/4 cup butter, softened 
1/2 cup sugar
6 eggs

BLEND, then add:
1 cup milk

BLEND, then add:
1/2 cup flour (gluten free OR unbleached wheat)

Divide ALL blended ingredients evenly into 2 medium mixing bowls.

(YOUR  SAVORY  CREPES) -
In one medium bowl stir in 1 teaspoon coarse black pepper.

(YOUR  SWEET  CREPES) -
In the other medium bowl stir in 1 teaspoon vanilla. (Mexican vanilla preferred).


Optional  Substitutes:

vegetable oil     - SUB in for: butter
almond milk     - SUB in for: milk


Crepes require undivided attention!

Using a cooking spray and several frying pans (sizes medium to large) cook 1/4 - 1/3 cup of batter at a time. 
 
Cook both sides until barely a golden brown; and spray your pan in between crepes so that they do not stick.  

Stack cooked crepes on a plate with pieces of parchment paper in between each one to keep from sticking.  

Keep making crepes until all the batter is gone.

Keep your Savory Crepes and Sweet Crepes on separate plates!  (Coarse pepper is not delightful with yogurt and fruit compote in my opinion...)


 - - - - - - - - - - - - - - - - - - - - - - - - - - 


SOME  NOTES:   

I have converted from frypans to a flat cast-iron specifically for crepes to make these... I won't lie. I have ONE and need at least one or two more to make this process blissful.  :0)  That said, a regular frypan will do!  

I like to use a swirl of olive oil for the first crepe on my frypans to set them up to not stick for the remaining ones. I know the crepes stick because I send my All-Clad through the dishwasher instead of hand-washing. The olive oil fixes all of that.


 - - - - - - - - - - - - - - - - - - - - - - - - - - 


Savory Crepe Ideas:


leftover rib meat

leftover brisket

leftover prime rib (if there ever is any...)

ham

cooked sausage

breakfast sausage


WITH Ideas:

scrambled eggs

hashbrowns

leftover baked potato chunks 

grated cheese (pepper jack is a favorite)


 - - - - - - - - - - - - - - - - - - - - - - - - - - 


Sweet Crepe Ideas:

sliced bananas
Nutella spread

fresh fruit
fruit compote
jam
Greek vanilla or Honey Yogurt


 - - - - - - - - - - - - - - - - - - - - - - - - - - 


Berry Compote:

1/2 cup sugar
2 cups berries (fresh or frozen)
1 teaspoon lemon juice
1 Tablespoon butter (optional)
1 cup water
2 Tablespoons cornstarch

In a medium saucepan combine sugar, berries, lemon juice and butter (if using butter...).  

Bring to a simmer.


In a small bowl combine water and cornstarch.


Slowly add to the saucepan and stir well to combine. 


Continue stirring while mixture simmers.


Cook until thick.


Remove from heat and serve with sweet crepes and vanilla Greek yogurt or honey Greek yogurt.


 - - - - - - - - - - - - - - - - - - - - - - - - - - 


Click Link FOR:
       
Mama Jo's Recipe Blog TABLE OF CONTENTS  


Monday, December 5, 2022

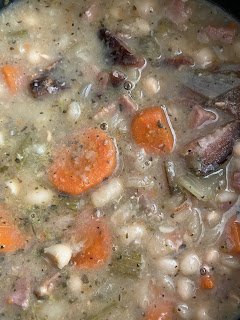
Grandma Teague's White Bean Soup // AKA: SOUP


Dear Reader,

You should know a little history about this soup...
All the names this soup has been called over the last few years and WHY:

* SOUP
* THE Soup
* Auntie Irene's Soup
* Grandma Teague's Soup
* Grandma Teague's White Bean Soup

I'm still not sure how I'll ever be able to make this soup for my family and not use two or more of these names as the answer to the "What's for dinner?" question!

And why so many names... ?

Well reader, that's where it gets complex. 

When Auntie Irene shared this recipe with me with it was with the understanding that it was not the original recipe of the soup she grew up with from Grandma Teague - BUT  IT  WAS  PRETTY  DANG  CLOSE  TO  IT! 

So who gets ownership?  Apparently both of the ladies since I have to literally explain the soup origin every time I make it because I have several other "white bean" soups in my soup repertoire.

I've been asked to share this recipe for a handful of years now.  It's well past due and I am indeed happy to share!  You, dear reader, get to decide which name you prefer to call it when made in your own kitchen.  Payton's vote is for:  SOUP.


SOUP


 - - - - - - - - - - - - - - - - - - - - - - - - - - 


2  pounds white navy beans 
   - - -  OR  Great Northern beans
1  quart chicken stock/broth
8  cups water
ham bone or ham hock (optional)
2-3 pounds cooked, diced ham (no nitrates preferred)
   - - -  a smoked spiral ham is my favorite!!!  And this SOUP is     the first thing I use the left-overs for.  

olive oil
3 medium onions, diced
1 bundle of garlic, minced
10-12 carrots, peeled and sliced into rounds
10-12 stalks of celery, diced or sliced
   - - -  basically an entire bundle of celery

3  TABLESPOONS  Italian seasoning
1/4  cup Better-Than-Bullion chicken paste
1  TABLESPOON Kosher salt
1  1/2  teaspoons coarse black pepper 


Sort -  rinse - pressure cook - drain - rinse 2 pounds of the bean you chose.

Set aside.  

(If you don't have a pressure cooker cook your bean of choice the morning of or the night before making this SOUP.)

In a very large pot cook carrots, celery and onions with 2-3 TABLESPOONS of olive oil for 5-10 minutes.

Stir often.

Add diced ham and garlic, cooking for an additional 5 minutes.

Stir often and cook until fragrant and slightly caramelized.

ADD:  chicken broth, water, chicken paste, prepared beans, ham bone, Italian seasoning, Kosher salt and coarse black pepper.

Bring all to a simmer.

Simmer for 1-2 hours.  

Stirring often (...and getting your stir spoon all the way to the bottom so you don't have any beans scorching!!!).

Additional water may be needed as SOUP cooks.

Additional Kosher salt and black pepper to taste.

Serve with cornbread.


 - - - - - - - - - - - - - - - - - - - - - - - - - - 


Click Link FOR:     Gluten-Free Cornbread


 - - - - - - - - - - - - - - - - - - - - - - - - - - 


Click Link FOR:
       
Mama Jo's Recipe Blog TABLE OF CONTENTS  


Monday, November 21, 2022

Almond - Pumpkin Seed - Cherry & Cranberry Snack Packs


NOTE: each 1/2 cup is 2 servings 


3 cups whole, raw almonds 
3 cups raw pumpkin seeds (pepitas)
1 cup dried cherries (no sulfur or nitrates)
2 cups dried cranberries (I prefer "low sugar")

Mix well in a large bowl.
Divide into 1/2 cup portions in sandwich ziplocks.
Store in the pantry and keep a snack pack nearby!
I’ve always got one in a backpack or travel bag or purse… you never know when you’ll need a quick healthy snack.

Makes about 18 1/2 cup servings.


- - - - - - - - - - - - - - - - - - - - - - - - - -


Click Link FOR: Mama Jo's Recipe Blog TABLE OF CONTENTS


Sunday, November 13, 2022

Baking With Natural Yeast - CINNAMON ROLLS


Click Link for Video:

Baking With Natural Yeast - Cinnamon Rolls


(PLEASE  NOTE  YOUTUBE  VIDEO  EDIT: 


ADD:

BUTTER  

or  

REFINED COCONUT  OIL 

with the brown sugar and cinnamon layer. 


Y'all! I forgot to add butter with the brown sugar and cinnamon layers... I realized what I had done after the video was done.  I melted it and dumped it on top of the rolls before baking like a cobbler recipe.  Worked out GREAT!!!)


 - - - - - - - - - - - - - - - - - - - - - - - - - - 


Click Link For Video:

Baking With Natural Yeast - Basic Bread Dough


 - - - - - - - - - - - - - - - - - - - - - - - - - - 


Click Link For Recipe:

Baking with Natural Yeast - BASIC LOAF


 - - - - - - - - - - - - - - - - - - - - - - - - - - 


BREAD  DOUGH: (PREP  DAY  BEFORE)


3  to  4 cups flour
1  teaspoon sea salt

2  Tablespoons - 1/4 cup honey
1/4 - 1/3  heaping cup natural yeast 
1  and 1/2 cups water


In a large GLASS or ceramic bowl combine flour and salt.  When combined, push flour out along the inside of the bowl to make a void in the middle.  In the void you’ve made, add all wet ingredients BEFORE mixing together.  Mix all ingredients until well combined.

Once all 5 ingredients are thoroughly combined, mixture should be slightly sticky in the middle, BUT mostly dry with no flour at the bottom of the bowl.  The edges of the dough should be dry, and the dough should be able to hold a roundish shape.  If mixture looks too wet or soupy and cannot hold a roundish shape, add a 1/4 cup flour until middle of dough is slightly sticky.  

Cover TIGHTLY with plastic wrap.  It has to be TIGHT like a drum… the best plastic wrap for this is a brand called “Stretch-Tight” in a bright yellow and blue box.   

*** FEED YOUR YEAST (SEE FEEDING INSTRUCTIONS) ***

Let rest on counter for 20-24 hours.  In warmer months or warmer homes it will be closer to 16-20 hours.  In colder months and homes it will hit the 24 hour mark.  Finding out how your yeast responds to your home will be a learning process as you get to know your yeast.  

You will know it is time to bake when the dough will be more than doubled, and be VERY bubbly throughout.


FILLING:

1 cup, heaping dark brown sugar

2 Tablespoons, heaping ground cinnamon

1  cup butter, softened  


(divide your filling ingredients into two parts // watch the video...)


FROSTING:

1 (8 ounce) package cream cheese, softened

1/4 cup butter, softened

1 1/2 cups powder sugar

1 teaspoon vanilla extract

1/8 teaspoon sea salt


Preheat oven to 350 degrees F.


Using parchment paper, drinking water and a bar pan push out 1/2 of the dough into a rectangular shape. 


Spread 1/4 cup of the softened butter over the dough and then spread evenly with 1/2 of the cinnamon and 1/2 of the dark brown sugar. 


Roll up dough and cut into 6-8 rolls.  


(Cutting tip:  use WAXED floss)


Place rolls in a lightly greased 9x13 inch baking pan. 


Cover and let rise until nearly doubled, about 45-60 minutes. 


Bake rolls until brown, about 28-35 minutes. 


While rolls are baking: with a hand mixer beat together softened cream cheese, butter, vanilla extract, and salt.  


Gradually add powder sugar until mixed well. 


The frosting is perfect on warm rolls!  


But also just as happy on a cold one...


Makes 12-16 rolls.


-----------------------------------------------------


Click Link FOR:
       
Mama Jo's Recipe Blog TABLE OF CONTENTS  


Tuesday, November 8, 2022

Gluten-FREE Peanut Butter Cookies


Secret ingredient:
Large granulated sugar
sprinkled on the tops


-----------------------------------------------------

Mama Jo:   "...it's Gluten-FREE."  

Always said after someone has taken one of these cookies from a stack, tray or cookie bag from whatever event these show up at.

And I have to confess:  always said with a smirk.

YUP.

They're that good.

It's like a magic trick.  

Sneaking in the "Gluten-FREE" and you can't even tell that it is Gluten-FREE (not even a little bit).

My favorite.


-----------------------------------------------------


(A recipe for your recipe:)

GLUTEN-FREE  FLOUR  MIX:


3 cups Bob's Red Mill -  RICE FLOUR
1 1/2 cups Bob's Red Mill -  TAPIOCA FLOUR
3/4 cup Bob's Red Mill -  POTATO STARCH  (OR SUBSTITUE WITH CORN STARCH)

1 heaping Tablespoon Bob's Red Mill -  XANTHAN GUM

1/2 Tablespoon sea salt 


Mix throughly - keep in an air tight container or fridge.
(Note: When using in a recipe as a wheat flour substitute - OMIT up to 1 teaspoon salt.)


-----------------------------------------------------


Peanut Butter Cookies

(Gluten-FREE)


Mix in a bowl and set aside:

3 1/2 cups Gluten-FREE flour mix

2 teaspoon baking soda


Cream/Beat for 8-10 minutes on HIGH:

1 cup sugar

1 cup packed brown sugar

1 cup (two cubes) softened butter


Then add to the creamed butter and sugars:

2/3 cup peanut butter (creamy)


Last, add to the creamed ingredients:

2 eggs

2 teaspoons vanilla


Options for the cookie tops:

* Large granulated sugar, sprinkled on the tops

* Hershey kisses, unwrapped

* Mini Recess Peanut Butter Cups, unwrapped


Mix dry ingredients in a bowl and set aside.  


Using a mixing stand: 

cream butter, sugars and beat on HIGH for 8-10 minutes; 

then add peanut butter.


Last, add egg and vanilla to the creamed ingredients; 

mix thoroughly.


Mix in dry ingredients.  


Roll into small balls (walnut size).  


Roll in sugar.  


Place on an un-greased cookie sheet.  


If using large granulated sugar as a topping: 

squish tops cross-wise with a honey-spoon or fork and sprinkle with large granulated sugar before baking. 


If using kisses or mini recess cups: place on cookie immediately once baked and out of the oven.  (Ideal with liners in a mini-muffin pan, but not required - cooking time and temperature remain the same.)


Bake at 375 for 8 minutes or until just BARELY browned on the bottom.  

-----------------------------------------------------


Click Link FOR:
       
Mama Jo's Recipe Blog TABLE OF CONTENTS