Saturday, November 26, 2016

Oatmeal Waffles


2 cups flour
3 cups old fashioned oats
2 Tablespoons baking powder
1 heaping teaspoon cinnamon
½ teaspoon salt
1/3 cup packed brown sugar

4 eggs beaten
3 and a 1/4 cups buttermilk
¾ cup melted butter


Mix all dry ingredients.

Mix all wet ingredients.

Combine together and cook according to your waffle iron manufacture’s directions.

Extras will freeze!  When ready to use, pop into the oven at 350 for 10 minutes or toast-up until warm and "toasty" in a toaster.


NOTES:  

I don't spray my non-stick waffle maker... there's enough butter to make these not stick!  :0)  Plus, I've noticed they've got crispy (not soggy) edges without the cooking spray.

My waffle maker can handle a 1/2 cup of batter per Belgian waffle section. This is a THICK batter and takes upwards of 4-5 minutes to get to a deep golden brown.  Experiment with your waffle maker, checking after 3 minutes and then adding 1 minute until you are able to find what's going to work best in your kitchen with your waffle maker.

Also, I have a friend who does these as pancakes, not waffles…  So if you're not sporting a waffle maker in your cupboard, I'm not leaving you out!


LAST NOTE:  (and maybe the most important one)
THESE  ARE  PERFECT  WITH  BUTTERMILK  SYRUP!!!  
ALWAYS  WORTH THE  EFFORT  TO  MAKE!!!


Get your waffle maker going!  
These don't take very long to get the ingredients together...


My KRUPS can handle 1/2 cup per square,
and takes 4-5 minutes to brown up nicely.
These are thick, so experiment and see what your's does for you...

DON'T SPRAY YOUR WAFFLE MAKER!
Try it at least once.  Please!
There's enough butter in here to take care of the stick,
and then you end up with crunchy edges.  Heavenly!  I promise!

These waffles were made with the helpfulness of Garrett...
He had the pleasure of making them for his sisters after taking seconds on a leftover dinner of Bacon Potato Soup.  The portions he helped himself to prove he eats enough for 2-3 people each meal.  Worked out well for me!  I've had this recipe saved as a draft for a few months now... just needed some photos.  ;0)


Click Link FOR:        Mama Jo's Recipe Blog TABLE OF CONTENTS


GLUTEN-FREE Oatmeal Waffles


2 cups GLUTEN-FREE flour mix
3 cups old fashioned oats
2 Tablespoons baking powder
1 heaping teaspoon cinnamon
1/3 cup packed brown sugar

5 eggs beaten
4 cups buttermilk
¾ cup melted butter


Mix all dry ingredients.

Mix all wet ingredients.

Combine together and cook according to your waffle iron manufacture’s directions.

Extras will freeze!  When ready to use, pop into the oven at 350 for 10 minutes or toast-up until warm and "toasty" in a toaster.


NOTES:  

Pretty sure these get made for dinner more than they ever do for a breakfast.  Say YES! to breakfast for dinner!!! (Just don't tell Greg Schroeder...)

I don't spray my non-stick waffle maker... there's enough butter to make these not stick!  :0)  Plus, I've noticed they've got crispy (not soggy) edges without the cooking spray.

My waffle maker can handle a 1/2 cup of batter per Belgian waffle section. This is a THICK batter and takes upwards of 4-5 minutes to get to a deep golden brown.  Experiment with your waffle maker, checking after 3 minutes and then adding 1 minute until you are able to find what's going to work best in your kitchen with your waffle maker.

Also, I have a friend who does these as pancakes, not waffles…  So if you're not sporting a waffle maker in your cupboard, I'm not leaving you out!


LAST NOTE:  (and maybe the most important one)
THESE  ARE  PERFECT  WITH  BUTTERMILK  SYRUP!!!  
ALWAYS  WORTH THE  EFFORT  TO  MAKE!!!


GLUTEN-FREE  FLOUR  MIX:

3 cups Bob's Red Mill RICE FLOUR
1 1/2 cups Bob's Red Mill TAPIOCA FLOUR
3/4 cup Bob's Red Mill POTATO STARCH
1 heaping Tablespoon Bob's Red Mill XANTHAN GUM
1/2 Tablespoon salt 

Mix throughly - keep in an air tight container or fridge.
(Note: When using in a recipe as a wheat flour substitute - OMIT up to 1 teaspoon salt.)


Get your waffle maker going!
These don't take very long to get the ingredients together...


My KRUPS can handle 1/2 cup per square, 
and takes 4-5 minutes to brown up nicely.
These are thick, so experiment and see what your's does for you...

DON'T SPRAY YOUR WAFFLE MAKER! 
Try it at least once.  Please! 
There's enough butter in here to take care of the stick, 
and then you end up with crunchy edges.  Heavenly!  I promise!


These waffles were made with the helpfulness of Garrett...
He had the pleasure of making them for his sisters after taking seconds on a leftover dinner of Bacon Potato Soup.  The portions he helped himself to prove he eats enough for 2-3 people each meal.  Worked out well for me!  I've had this recipe saved as a draft for a few months now... just needed some photos.  ;0)


Click Link FOR:         Mama Jo's Recipe Blog TABLE OF CONTENTS


Wednesday, November 23, 2016

Mama Jo's Apple Crisp - GLUTEN-FREE


Evolution of the baker: 
Nephew's gluten, corn and dairy allergies are discovered with a climax of ER visits.  
Sister has to learn how to cook in a way that she's not just cooking for one person, and then again for the rest of her family.
I visit her, she visits me... and in helping cook for both family's I am taught how to modify and/or eliminate the allergy foods that I would normally have in my menu line up.
Then around the beginning of 2015 I realize that there are severe gluten intolerances with two of my four kids...   

I cannot adequately explain how blessed I felt in the beginning of 2015 that I not only had a firm knowledge of how to transition what gluten we were eating out of our family's main diet; but how blessed I felt with the experience of being taught and guided by my own sister.  

The transition wasn't scary.  
It wasn't overwhelming.  
It was a deep breath and an "OKAY".
I can do this.

I haven't given up baking... (My sugar purchasing and consumption prove that quite quickly.)  I've learned to become modified in all things baked.  

Here's my apple crisp, GLUTEN-FREE and no one will even know...

NOTE:  If you're not having to modify for yourself or your family, at the end of the post you can find the original recipe un-modified and using all-purpose flour.


GLUTEN-FREE  FLOUR  MIX:

3 cups Bob's Red Mill RICE FLOUR
1 1/2 cups Bob's Red Mill TAPIOCA FLOUR
3/4 cup Bob's Red Mill POTATO STARCH
1 heaping Tablespoon Bob's Red Mill XANTHAN GUM
1/2 Tablespoon salt 
Mix throughly - keep in an air tight container or fridge.
(Note: When using in a recipe as a wheat flour substitute - OMIT up to 1 teaspoon salt.)


GLUTEN-FREE:   MAMA  JO’S  APPLE  CRISP


4 cups cooking apples, peeled and thinly sliced   (about 5-6 medium apples)     

*** (NOTE:     ANYTHING but Red Delicious apples!  
                          Jonathan, Fugi apples or Granny Smith’s are the BEST 

1 Tablespoon cinnamon

3/4 cup GLUTEN-FREE flour mix
3/4 cup old fashioned oats
3/4 cup packed brown sugar
1/2 cup butter melted


Put sliced apples in bottom of a 9X13 pan.  

Sprinkle with cinnamon and mix throughly, until all apple pieces have cinnamon coating that you can see.  

Mix remaining four ingredients in a bowl.

Crumble mixture on top of the apples.  

Bake at 375 for 40-50 minutes or until topping is golden and apple juices are bubbling.  

Serve warm with whipped cream, or vanilla ice cream.


Whipped Cream:

2 cups heavy whipping cream
1/2 cup powdered sugar
1 teaspoon vanilla

Mix in mixer or with a hand mixer until very thick.

Make ahead of time and refrigerate until serving.


MAMA  JO’S  APPLE  CRISP


4 cups cooking apples, peeled and thinly sliced   (about 5-6 medium apples)     

*** (NOTE:     ANYTHING but Red Delicious apples!  
                          Jonathan, Fugi apples or Granny Smith’s are the BEST 

1 Tablespoon cinnamon

3/4 cup all-purpose flour 
3/4 cup old fashioned oats
3/4 cup packed brown sugar
1/2 teaspoon salt
1/2 cup butter melted


Put sliced apples in bottom of a 9X13 pan.  

Sprinkle with cinnamon and mix throughly, until all apple pieces have cinnamon coating that you can see.  

Mix remaining four ingredients in a bowl.

Crumble mixture on top of the apples.  

Bake at 375 for 40-50 minutes or until topping is golden and apple juices are bubbling.  

Serve warm with whipped cream, or vanilla ice cream.


Blog PHOTOS Photographer:     Gavin M. Davis - October 30, 2016


Click Link FOR:       Mama Jo's Recipe Blog TABLE OF CONTENTS


Sunday, November 20, 2016

Pretty and ALL PINK Strawberry Cake


I wish I knew where to begin with this cake... Do I tell you about ALL the birthdays this cake has been center stage?  Or all the baby showers?  I think there was a solid nine year streak,  not too long ago, where at least a handful of family and friend birthdays featured this particular cake.  My kitchen wall has a collage of photos around the statement "Food Is Love" and I just counted - 3 of these strawberry cakes! Three different birthdays, all years apart, and yet connected with this one cake.  It's a keeper!  

It is fresh, delicious, and so sugary that "it'll make your teeth hurt" according to the handsome Bret Sr. 

Please take note:  This cake is best served at least 4-5 hours chilled in the fridge, so plan ahead!  Set time aside early to bake this cake and to make room in your fridge.  


But first... an Ode to Jerry Man:  
(An sincere apology, for I truly did not know you'd been left out!)


Ode to Jerry Man

Of birthday parties for years and years you came, 
But this cake - you never knew its name!

Until we moved, and to Bret's side you flew.
A birthday trip!  The bike ride, not the first of a few...

Cake before we go!
Oh little did we know...

In the wee hours of the morn',
Your heart's desire was sworn.

The last of the cake gone.
Where did we go wrong???

Jerry Man, we do not blame,
It was on us for being so lame.

Your first strawberry cake, 
(shared MANY years too late...)
Now it's your's to bake.


CAKE:

1 package plain white cake mix  
1 package (3 ounces) strawberry JELL-O 
1/2 cup all-purpose flour
1/2 cup granulated sugar

1 cup vegetable oil
1/2 cup whole milk
4 large eggs

1/2 cup finely chopped fresh strawberries 


BAKING:

3 - 9 inch baking pans
LouAna's refined coconut oil (for greasing pans)
granulated sugar (for dusting...  SUGAR YOUR PANS!)


FROSTING:


1 cup butter, room temperature
8 cups powder sugar
1 cup finely chopped fresh strawberries


OPTIONAL  GARNISH:

1 cup fresh strawberries, halved or slightly sliced, for decoration 


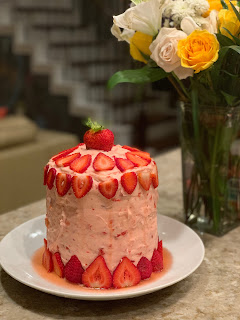
(Finished Cake.  Yes.  I am that mean... A photo to motivate you to get to  the end of this photo lineup;  and to tempt you to try this recipe!)
(Finished Cake.  Yes.  I am that mean...
A photo to motivate you to get to 
the end of this photo lineup; 
and to tempt you to try this recipe!)


Gather all your dry ingredients in a large mixing bowl.
You're going to need a hand mixer, 
so your bowl needs to be big enough to contain the spray...  
A Kitchen-Aid is okay, 
but you're going to do better with a hand mixer for this one!

1 package plain white cake mix  
(if you don't live in Texas near an HEB 
for their store brand Hilltop cake mix 
- Phillsbury is my 2nd choice)

1 package (3 ounces) strawberry JELL-O 
(don't even think about the sugar-free box)

Mix dry ingredients.  

Gather:
oil, whole milk, eggs and get your strawberries chopped up.
(If you have a Pampered Chef Food Chopper...
This is what the cover is VERY useful for!)

Mix all ingredients on LOW speed until fully combined.

Once all ingredients are fully combined,
turn your hand mixer up to
MEDIUM speed for 2 minutes.
Timed.  (Set your timer...)  No more, no less.

Add your chopped strawberries for the cake portion:
1/2 cup

Slowly fold in with a scrapper.  Or spatula.
Or whatever you grew-up calling a rubber scrapper thingy
that resides in your kitchen drawer...

Fold chopped strawberries in until evenly
mixed throughout your cake batter.

We are going to have to talk about this EVERY time, aren't we?
Seriously people... This is how it works.
Grease them up and then you sugar your baking pans.
I'm sharing my soul here... 

I only used to tell a few people what I really did.
My confessions of recipe omission with this one photo.

Evenly divide your cake batter between your
3 greased and SUGARED baking pans.

My pans are my late grandmother's.
I had to pinky promise to hand wash them.  And I do.
They get a lot of attention and love from me.  :0)

Bake at 350 degrees for 20 minutes.
(Be sure to keep the oven shut until the first check at 20 minutes!)

Using a cake tester, check each pan for doneness.
If cake tester comes out gooey... give your cakes another 3-5 minutes.
Officially - I've never had these pretties cook less than 25 minutes.
They are heavy with the fresh fruit and added ingredients.
With that note, every oven is different. 

These cake layers are done and have a very deep,
golden brown color compared to the 20 minute test photo.
Few extra baking minutes make ALL the difference!

Let cake layers rest in their pans for 10 minutes. 
(NO MORE!  NO LESS!)
And then gently bump out onto cooling racks, 

with the top of the cakes layers facing UP. 

Gather your frosting ingredients:
1 cup butter (2 sticks)
8 cups powder sugar (1 - 2 pound bag without measuring) YUP!

1 cup fresh strawberries, chopped

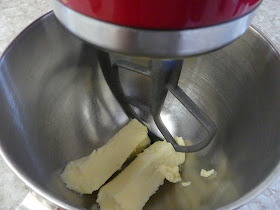
Add 1 cup butter to mixer, and cream.


Add 1 cup of powder sugar at a time.

After each cup is added, turn mixer on low 
until sugar is fully combined, and then turn 
your mixer on MED-HIGH for 10 seconds.  
Do this for each added cup of powder sugar.

Once about 1/2 or all the sugar is added,
add the 1 cup fresh strawberries.


Keep the mixer on low until the strawberries are combined well,
and strawberry pieces are visible throughout.

Using a bread knife, gently slice the tops off your two ugliest layers...
The uneven ones.  ;0)


Spread some frosting to the plate or cake plate or cake carrier you are  using.

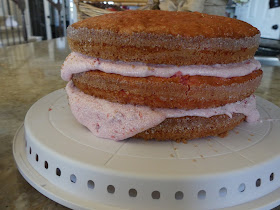
Start layering the cake and frosting.
Be GENEROUS with your frosting.  You have a ton!
NOTE:  Do not spread the frosting to the edges, the layers of the cake will do the job for you as they get piled on the cake will take on the look of a torte without much effort. 

Use your second layer of cake to squish down on your first layer of frosting.

Another layer of frosting.
Do not spread out to the edge very much.
Just squish with your last cake layer.

Save your nicest looking, and most evenly baked layer for last. 

Scratch and Sniff sticker here:   Strawberry Cake.

OPTIONAL  GARNISH  NOTE:
you can use halved strawberries around the base of the cake,
but you don't have to... ;0)


NOT  OPTIONAL  FRIDGE  NOTE:
This cake goes in the fridge unless
it is being consumed.
If it has been in the fridge for more than 5 hours, 

take it out 15-20 minutes before serving.  

If there are any leftovers, 

may I suggest hiding them in your cheese drawer...


This hot mess was Greg Schroeder's 30th birthday cake...
It is NOT pink - but still amazingly delicious!  :O)
A big black cake is just what you need on your 30th -
and it needs to be a cake you want to eat!


02/09/2020

Payton Olivia's
15th Birthday cake
REQUEST  granted


Click Link FOR:       Mama Jo's Recipe Blog TABLE OF CONTENTS